
Selecting the right lip liner shade based on skin tone is crucial for enhancing natural lip color and defining smile shape. Start with lip exfoliation and moisture, then use lip liner to shape and fill in dry spots for a smooth base. Evenly outline and define lips with matching or complementary liner to prevent lipstick from bleeding. Blend with a fine-tipped brush for a seamless look, enhancing longevity and definition of your lipstick application.
“Elevate your makeup routine with the art of applying lipstick like a pro. From choosing the perfect lip liner shade tailored to your skin tone to securing long-lasting color, each step is crucial for achieving a flawless look. Discover how preparing and moisturizing your lips properly creates a canvas for precise application. Master the technique of blending lip liner for a seamless finish, then seal it in with lipstick for definition that lasts. Uncover the secrets to achieving pouty, polished lips with our comprehensive guide, focusing on the power of a well-chosen lip liner.”
- Choose the Right Lip Liner Shade for Your Skin Tone
- Prepare and Moisturize Your Lips Before Application
- Apply Lip Liner Evenly Along the Lip Line
- Blend the Lip Liner with a Lip Brush for a Smooth Finish
- Finish with Lipstick for Long-Lasting Color and Definition
Choose the Right Lip Liner Shade for Your Skin Tone
When selecting a lip liner, choosing the right shade that complements your skin tone is essential. For fairer complexions, opt for neutral or light pink hues as they can enhance your natural lip color without overpowering it. Warmer skin tones often look great with brown or peachy lip liners, adding depth and dimension to your smile. Darker complexions may pull off bold colors like deep red or burgundy, which can create a striking contrast and define the lips.
The right lip liner serves as a base for your lipstick, helping to extend its wear and create a more precise, polished look. It’s a key tool in defining your lips’ shape and adding subtle color, making it worth taking the time to choose the perfect shade that harmonizes with your skin tone.
Prepare and Moisturize Your Lips Before Application

Before applying lipstick, it’s essential to prepare and moisturize your lips for a smooth and long-lasting finish. Start by gently exfoliating your lips with a soft toothbrush or a specialized lip scrub to remove any dry skin. This step ensures that your lipstick glides on effortlessly and creates a seamless look.
After exfoliation, use a moisturizing lip balm or a hydrating lip mask to nourish your lips. Well-moisturized lips will prevent the lipstick from settling into fine lines or cracking, ensuring a vibrant and even color application. Consider using a lip liner to define the shape of your lips and fill in any areas that need extra hydration. This additional step can enhance the overall aesthetic and make your lipstick last longer.
Apply Lip Liner Evenly Along the Lip Line

To create a smooth, long-lasting application, start by using a lip liner to outline your lips evenly. This step is crucial for defining your pout and ensuring the lipstick stays put throughout the day. Take your time to carefully trace along your natural lip line, both upper and lower lips, filling in any gaps or uneven areas. A precise, even line will help you achieve a flawless finish and prevent the lipstick from bleeding outside the desired area.
The lip liner should match or complement your lipstick shade for a harmonious look. You can choose a similar color for a subtle effect or go for a contrast for a more dramatic style. By applying the lip liner first, you’re not only defining your lips but also creating a canvas that enhances the final lipstick application.
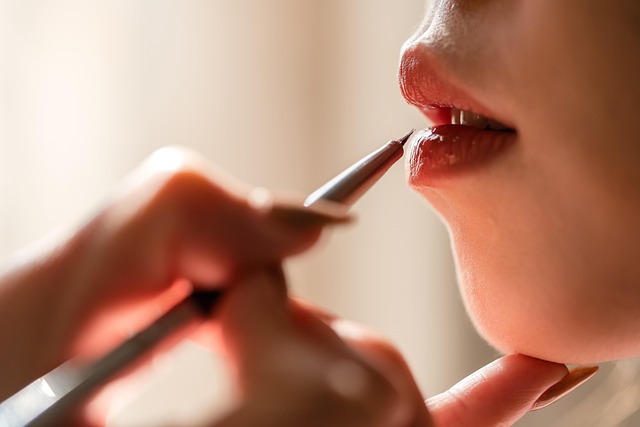
Blend the Lip Liner with a Lip Brush for a Smooth Finish
For a seamless and professional look, blending your lip liner with a lip brush is a must. This technique ensures that the line between your lipstick and natural lip line is blurred, creating a smooth, effortless finish. Using a fine-tipped lip brush, dip it into your chosen lip liner and gently dab along your upper and lower lip lines. Start from the center and work your way outwards to avoid harsh lines. The brush will help you achieve a subtle blend, making the transition between your lips and the liner nearly invisible.
This blending step is especially crucial when using a darker or highly pigmented lip liner to prevent it from appearing too stark. By taking the time to blend, you’ll enhance the overall appearance of your lipstick application, ensuring a more natural and polished result.
Finish with Lipstick for Long-Lasting Color and Definition

To achieve long-lasting color and definition, finish your lipstick look with a touch of lip liner. This simple step can make all the difference in how your lipstick wears throughout the day. Start by outlining your lips with the lip liner, following the natural contour of your mouth. This creates a barrier, preventing the lipstick from fading or bleeding into fine lines.
Once you’ve outlined your lips, apply your lipstick as usual. The combination of lip liner and lipstick will result in enhanced color payoff and extended wear, ensuring your pout stays vibrant and defined for hours. Plus, using a lip liner can help correct any uneven application, giving you a flawless, polished finish.
Applying lipstick seamlessly begins with mastering the art of lip liner. By choosing the right shade tailored to your skin tone, preparing your lips with adequate moisture, and meticulously blending the lip liner for a smooth finish, you lay the perfect foundation for long-lasting color and definition. Integrate these steps into your routine for a polished look that enhances your natural beauty. Don’t forget, the right lip liner is a game-changer in achieving that flawless, lasting pout.